Broken links are one of the most common — and most overlooked — SEO issues. They frustrate visitors, waste crawl budget, and leak the link equity you’ve worked hard to build.
I’ve audited hundreds of websites, and almost every one has broken links hiding somewhere. The good news? They’re easy to find and fix once you know where to look.
This guide covers everything: what broken links are, why they matter, how to find them using free tools, and exactly how to fix each type.
What Are Broken Links?
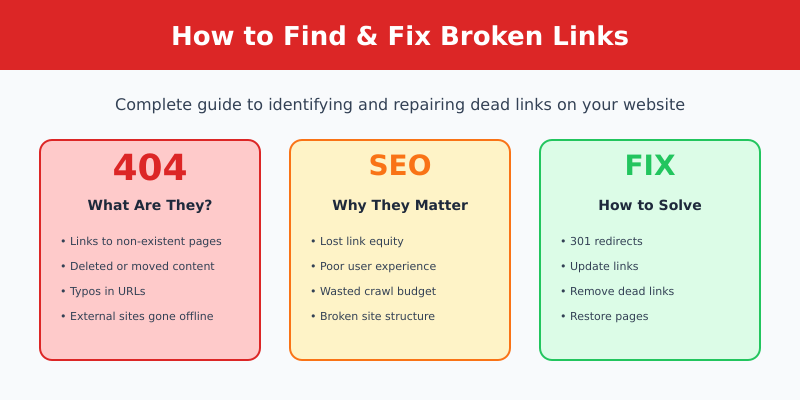
A broken link (also called a “dead link”) is a hyperlink that points to a page or resource that no longer exists or can’t be accessed. When someone clicks a broken link, they see an error page instead of the content they expected.
The most common error is the 404 Not Found page, but broken links can return other errors too:
| Error Code | Meaning | Common Cause |
|---|---|---|
| 404 | Page not found | Page deleted or URL changed |
| 410 | Gone (permanently) | Content intentionally removed |
| 500 | Server error | Server-side problems |
| 503 | Service unavailable | Server overload or maintenance |
| Timeout | No response | Server too slow or offline |
Internal vs External Broken Links
Internal broken links point to pages on your own website that no longer exist. These are fully within your control to fix.
External broken links point to other websites. The linked page may have been deleted, moved, or the entire site might be gone. You can’t fix the destination, but you can update or remove the link.
Why Broken Links Matter for SEO

Broken links hurt your website in several ways:
1. Lost Link Equity
When external sites link to a page that returns a 404, you lose the “link juice” (ranking power) those backlinks provide. Google can’t pass value through a dead end.
This is especially painful if you have quality backlinks pointing to pages you’ve deleted or moved without redirects.
2. Poor User Experience
Nothing frustrates visitors more than clicking a link and hitting a dead end. Broken links:
- Increase bounce rates
- Reduce time on site
- Damage trust and credibility
- Lead to lost conversions
3. Wasted Crawl Budget
Search engine bots have limited time to crawl your site. Every time they hit a 404, they waste crawl budget that could be spent indexing your actual content.
For large sites, this can mean important pages get crawled less frequently.
4. Broken Internal Linking
Internal links help distribute page authority throughout your site. When internal links break, that flow of authority stops, weakening your site structure.
What Causes Broken Links?
Understanding the causes helps prevent future broken links:
- Deleted pages — Content removed without setting up redirects
- URL changes — Permalinks changed without redirects
- Typos — Mistyped URLs when creating links
- Site migration — Moving to a new domain or CMS without proper redirects
- External site changes — Other websites delete or move their content
- Domain expiration — Linked websites go offline permanently
- Incorrect relative URLs — Links that worked in one location but break when content moves
How to Find Broken Links
There are several methods to find broken links on your website, from quick online checks to comprehensive site crawls.
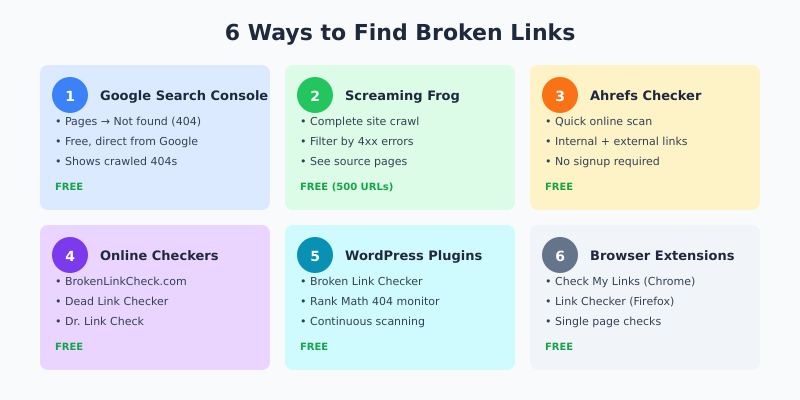
Method 1: Google Search Console (Free)
Google Search Console reports crawl errors including 404 pages that Google’s bot has encountered.
How to check:
- Go to Google Search Console
- Navigate to Pages (formerly Index Coverage)
- Click on Not found (404) in the “Why pages aren’t indexed” section
- Review the list of 404 URLs
Limitation: Only shows pages Google tried to crawl — doesn’t catch all internal broken links.
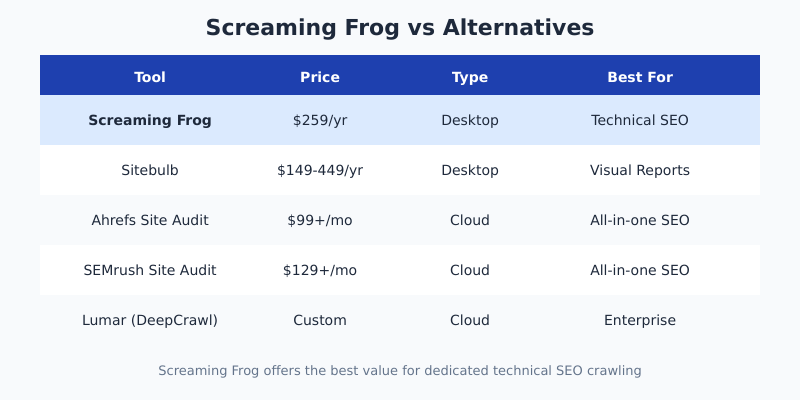
Method 2: Screaming Frog (Free up to 500 URLs)
Screaming Frog SEO Spider crawls your entire site and identifies all broken links — both internal and external.
How to check:
- Download and open Screaming Frog
- Enter your website URL and click Start
- Wait for the crawl to complete
- Click Response Codes tab
- Filter by Client Error (4xx)
- Click any broken URL, then check the Inlinks tab to see which pages link to it
This is my preferred method because you see exactly which pages contain the broken links.
Method 3: Ahrefs Broken Link Checker (Free)
Ahrefs Broken Link Checker is a free online tool that quickly scans any website for broken links.
How to use:
- Enter your domain
- Click “Check broken links”
- Review the results showing broken internal and external links
Quick and easy, but limited depth compared to a full crawl.
Method 4: Online Broken Link Checkers
Several free online tools can scan your site for broken links:
- BrokenLinkCheck.com — Simple online checker, no signup required
- Dead Link Checker — Checks single pages or entire websites
- Dr. Link Check — Also detects malicious links and SSL issues
These are good for quick checks but may miss links on JavaScript-heavy pages.
Method 5: WordPress Plugins
If you use WordPress, dedicated plugins can monitor your site for broken links:
- Broken Link Checker — Monitors posts, pages, and comments for broken links
- Rank Math — Includes 404 monitoring in the free version
- Yoast SEO Premium — Redirects manager helps fix broken links
Warning: The Broken Link Checker plugin can slow down your site if you have lots of content. Consider running it periodically rather than continuously.
Method 6: Browser Extensions
For checking individual pages:
- Check My Links (Chrome) — Highlights broken links on any page
- Link Checker (Firefox) — Similar functionality for Firefox users
Great for spot-checking important pages after updates.
How to Fix Broken Links
Once you’ve found broken links, here’s how to fix them based on the situation:
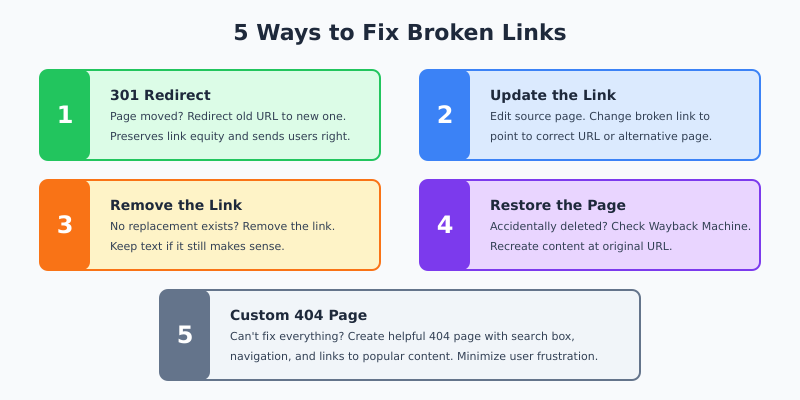
Fix 1: Set Up 301 Redirects
If you moved or renamed a page, redirect the old URL to the new one. This preserves link equity and sends visitors to the right place.
In WordPress:
- Use Rank Math’s redirect manager (free)
- Use Yoast SEO Premium’s redirect feature
- Use the Redirection plugin (free)
In .htaccess (Apache):
Redirect 301 /old-page/ https://yoursite.com/new-page/In nginx:
rewrite ^/old-page/$ /new-page/ permanent;Fix 2: Update the Link
If you have internal links pointing to a deleted page, update them to point to a relevant existing page.
Steps:
- Find all pages linking to the broken URL (Screaming Frog’s Inlinks tab helps)
- Edit each page
- Update the link to point to the correct URL
For external broken links, either find the new URL (check if the page moved) or link to an alternative resource.
Fix 3: Remove the Link
If the linked content no longer exists and there’s no suitable replacement, remove the link entirely. Keep the surrounding text if it still makes sense.
Fix 4: Restore the Page
If a page was accidentally deleted and has valuable backlinks, consider restoring it:
- Check the Wayback Machine for archived versions
- Recreate the content
- Publish at the original URL
This recovers the lost link equity from existing backlinks.
Fix 5: Create a Custom 404 Page
You can’t fix every broken link, especially external ones pointing to your site. A helpful 404 page minimizes frustration:
- Acknowledge the error
- Provide a search box
- Link to popular pages or categories
- Include navigation to help visitors find what they need
Best Practices for Preventing Broken Links
Prevention is easier than fixing. Follow these practices to minimize broken links:
1. Always Redirect When Deleting or Moving Pages
Before deleting any page, check if it has:
- Backlinks (check in Google Search Console or Ahrefs)
- Internal links pointing to it
- Organic traffic
If yes, set up a redirect to a relevant page before removing it.
2. Use Absolute URLs
Prefer full URLs (https://yoursite.com/page/) over relative URLs (/page/). Absolute URLs are less likely to break during site changes.
3. Check Links Before Publishing
Before publishing any content, verify that all links work. Use browser extensions like “Check My Links” for quick verification.
4. Run Regular Audits
Schedule periodic broken link audits:
- Small sites: Monthly
- Medium sites: Bi-weekly
- Large sites: Weekly or continuous monitoring
5. Be Careful with External Links
External links are beyond your control. To minimize issues:
- Link to authoritative, established websites
- Avoid linking to pages likely to change (product pages, news articles)
- Prefer linking to main pages rather than deep internal pages
Broken Link Checker Tools Comparison
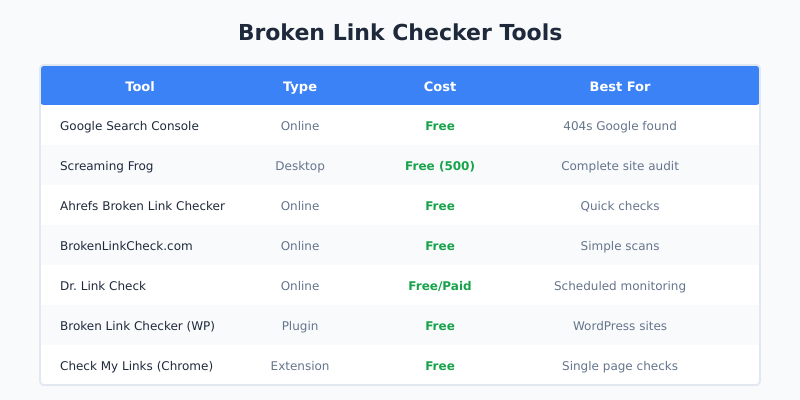
| Tool | Type | Cost | Best For |
|---|---|---|---|
| Google Search Console | Online | Free | 404s Google found |
| Screaming Frog | Desktop | Free (500 URLs) | Complete site audit |
| Ahrefs Broken Link Checker | Online | Free | Quick checks |
| BrokenLinkCheck.com | Online | Free | Simple scans |
| Dr. Link Check | Online | Free/Paid | Scheduled monitoring |
| Broken Link Checker (WP) | Plugin | Free | WordPress sites |
| Check My Links | Extension | Free | Single page checks |
FAQ
Do broken links hurt SEO?
Yes. Broken internal links waste crawl budget and break your site’s link structure. Broken pages that have backlinks lose the ranking value those links provide. Google has confirmed that excessive 404 errors can indicate poor site quality.
How many broken links are too many?
Even one broken link on an important page is too many. For the overall site, aim for zero broken links to internal pages. Some broken external links are inevitable over time, but fix them when discovered.
Should I use 301 or 302 redirects for broken links?
Use 301 (permanent) redirects in almost all cases. A 301 tells search engines the page has permanently moved and passes link equity to the new URL. Only use 302 (temporary) if you genuinely plan to restore the original page soon.
How often should I check for broken links?
At minimum, monthly. Large or frequently updated sites should check weekly. After any major site changes (redesign, migration, URL restructure), do a complete broken link audit immediately.
What if I can’t find a replacement for a broken external link?
Check the Wayback Machine to see what the page contained. Then either find similar content elsewhere to link to, or remove the link and adjust the surrounding text. Don’t leave broken links just because you can’t find a perfect replacement.
Final Thoughts
Broken links accumulate over time on every website. External sites change, pages get deleted, URLs get updated — it happens. The key is catching and fixing them before they harm your SEO and user experience.
Start with Google Search Console to see what Google has already found. Then run a complete crawl with Screaming Frog for the full picture. Set up 301 redirects for moved content, update links to deleted pages, and create a helpful 404 page for anything you can’t fix.
Make broken link audits part of your regular SEO maintenance. It’s one of those small tasks that compounds over time — fix them now, and you won’t have a massive cleanup job later.
I find and fix broken links as part of every technical SEO audit. This guide reflects the process I use for my own sites and client work.